

If you own a website, an essential way to keep it secure is making sure all website traffic runs as HTTPS. This means that an HTTPS certificate encrypts your website traffic, so bad actors can’t steal any information as steal information as customers use your website.
Using HTTPS is also a meaningful way to rank higher on Google, as Google promotes secure websites.
However, the common problem is that while your website might have a secure certificate, it may not force all your traffic to use it. That’s where an “HTTP Strict Transport Security” or HSTS comes into play. This policy ensures browsers ignore the HTTP version of your website. Together with a way to direct HTTP traffic to HTTPS, this is a powerful, yet easy, way to protect your website.
What is the HSTS Policy?
This policy is basically stamped across any file downloaded from your website, and it tells your browser that if the file was accessed from an insecure, HTTP connection, then don’t show the file.
It is basically a text statement. It is composed of a recognized name, “Strict-Transport-Security,” and then a series of variables. The variables in an HSTS policy explain how browsers are to manage your website traffic. The variables include:
max-age: This tells browsers how long to recognize the “HTTPS” settings for a website in seconds. 31536000 is the most common entry because it represents one year, which means a browser used to view your website won’t reset its memory for a full year from the time it first saw your website. If you add a subdomain within that year, you’ll need to change “max-age” to “0” to force browsers to reset how it handles your website.
includeSubDomains: This value ensures that your policy covers any subdomain that you might use, including “www.” Ignoring this variable can expose your website to attack as bad actors could then use a subdomain unencrypt your website traffic.
preload: Chrome maintains a hardcoded list of websites that are HTTPS only. If you want your website on that list, then include this variable; however, if you ever think you’ll need to revert to HTTP, then don’t use this value. Removing your site from the preload list could take months. For more information, see removal options here.
While installing HSTS is important, installation is not hard. Here are the instructions for both IIS and Apache. However, before you start, you may want to do the following:
- Make sure your website has a valid HTTPS certificate installed.
- Ensure your domain redirects content to your website’s HTTPS version or that the HTTPS redirect service on your website software is working.
Not doing these two items first will make your website unusable after installing your HSTS policy.
Installing HSTS on IIS
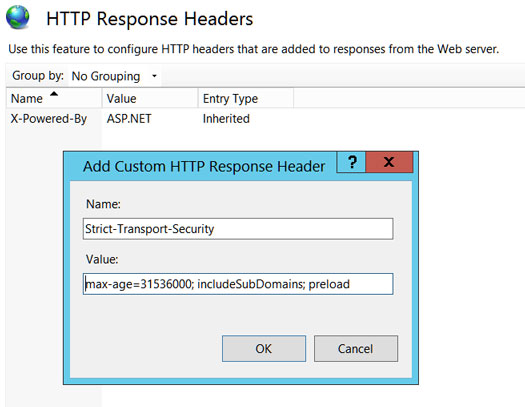
To install HSTS on IIS, log into your instance of Internet Information Server, click on your target website, and open the “HTTP Response Headers” button.
- Click “Add” and enter the following:
- In the “Name” field: Strict-Transport-Security
- In the “Value” field: max-age=31536000; includeSubDomains; preload
- Click “OK”
Installing HSTS for WordPress on Apache
We always access our WordPress files using C-Panel; however, if you wish to use SSH, you can find a great tutorial here.
- From your C-Panel, open File Manager and locate your .htaccess file.
- Open the file as “Edit” and add the following entry right above the line “# Begin WordPress“:
Header always set Strict-Transport-Security “max-age=31536000; includeSubDomains; preload” env=HTTPS - Save the file.
Testing Your HSTS Policy
Before saving your policy for an entire year, set “max-age” to 300 and test your website to ensure it’s working correctly. This change will enable your policy for only five minutes at a time and allow you to make changes without disabling your site on your test browser for a full year.